
Rendering your Stereoscopic Animation
1. Open your Blender project
2. Click File – User Preferences
4. Select Object in the left menu

5. Click Install Addon
6. Navigate to stereoscopic_camera-1-6-7.py and click Install Addon

7. There should be a new object in your addons-object lists called Object: Stereoscopic Camera
8. Check the box to the right of Object: Stereoscopic Camera

9. Exit User Preferences
10. Right click select the camera and select the Object Data property (the one that looks like a video camera) 
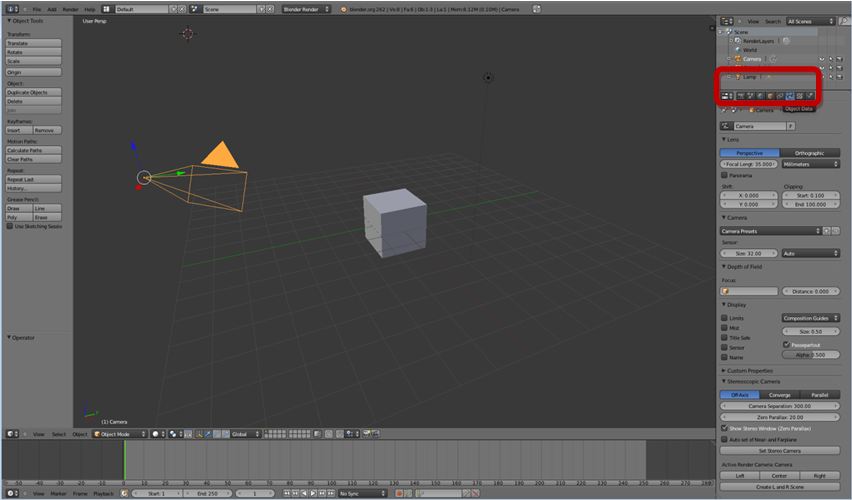
11. Scroll down to the bottom of the Object Data menu
12. Click Set Stereo Camera

13. Click Create L and R Scene

14. With the center camera selected, change the Editor window to Node Editor

15. In the Node Editor select the Compositing icon and check Use Nodes

16. Press the “delete” key to get rid of existing nodes (you won’t need them)
17. Press “n” to open the Properties Toolbar
18. In the Properties Toolbar under Stereoscopic Presets, ensure that side-by-side is the
selected preset
19. Click AddNodes

20. There are 3 Render Layers nodes present, one is not connected to any other nodes, you can delete that one
21. Ensure that the scene in the other 2 Render Layers nodes is set so that on is Left_Camera and the other is Right_Camera

22. In the File Output node change the filetype to jPEG

23. Set the output directory by clicking on the file icon  and navigating to desired output location
and navigating to desired output location
24. Select the Render property 
25. In the Render Properties menu, set the Frame Range to the desired range

26. Click Animation to render the animation

27. Change the Editor window to Video Sequence Editor

28. With the Cursor in the editor window press “shift”+“A” and select Image

29. Navigate to the directory where you exported the animation frames to
30. Select all jPEG’s that are part of the animation

31. Select Add Image Strip
32. Press “G” to grab the image strip and move it with the mouse to start at frame “0”
33. Click to accept the movement

34. In the Properties Menu, change the output file type to AVI Codec

35. Click the file icon in the output menu to select the output directory

36. Navigate to the directory where you want to create the AVI and select Accept

37. Change the X Resolution to double what it is (i.e. if 1920, change it to 3840)

38. Select Animation in the Properties Menu to render the AVI

No comments:
Post a Comment